I wanted to begin by going into a bit more detail on how I start my portraits. Over the years I have tried many different techniques, but this one works best for me. I have worked this technique to the past 10 years, at least. I work with a projector instead of taking the extra time to do a free-hand drawing. The color portion of the portrait is the most important part, in my opinion. If the drawing isn't correct in the beginning, then the final piece will be absolutely worthless. The pencil drawing is SUPER important, because it helps me to understand the structure of the face that I am drawing. But as you will see later in this post the pencil lines are erased and I freehand the colored pencil application while only using the original image for my color choices and where the shadows/highlights show up on the face.
I always start by making sure that my paper is cut to the exact size that I will be working on. For this specific piece I will be working on an 18"x24" sheet of paper. The only paper that I had here was 19"x24", so before getting started I measured out an inch on the 19" side of the paper with my T-ruler and cut off the excess.
 |
| Cutting off the excess inch |
 |
| Erasing all any extra marks |
My main supplies are:
- Strathmore Drawing Paper
- Electric Sharpener - better than killing my fingers with a manual one
- Ruler
- Pencil brush - Eliminates stray pencil shavings before they can make a mess of my work
- Scissors
- Pencil
- Eraser
- Prismacolor Colored Pencils (There are no others in my opinion :)
- Sharpie Marker - mostly for the pupil in the eye
- White Gel Pen - for highlights in the eyes and on the lips
- My Color Journal - for keeping up with my color choices for specific portraits
 |
| My set up |
This portrait is a split image of mom and daughter. The top half of the portrait will contain the older image and the bottom half will contain a more current image. In order to get the placement of the image right I had to make sure to measure and pencil in a midline to create a small space in between the images. No need for the images to run together.
 |
| Original images |
 |
| Midline added |
I, personally, use a Prism Opaque Projector to enlarge my images. This ensures that I get the image traced onto my final paper without issues or extra time spent on the drawing portion. At close to $300 this projector can enlarge images up to 20x the original size and the picture is clear enough for me to transfer small details for the final image. I also have a handy-dandy stand for it. After years of using a stool I figured it was worth the purchase. It is super easy to use, too. You just take you original image, which I printed as a 5"x7" image on photo paper. Flip the photo upside-down and place the photo underneath the metal clip located under the lid. Close the lid and turn it on, then I can work with the machine to get the final image the size I want. I place my paper onto the wall using sticky tack on the four corners on my paper.
 |
| My Prism Opaque Projector |
 |
Orignial 5"x7" on photo paper
Ready to be placed upside-down and projected onto the wall |
 |
| The image projected onto my paper |
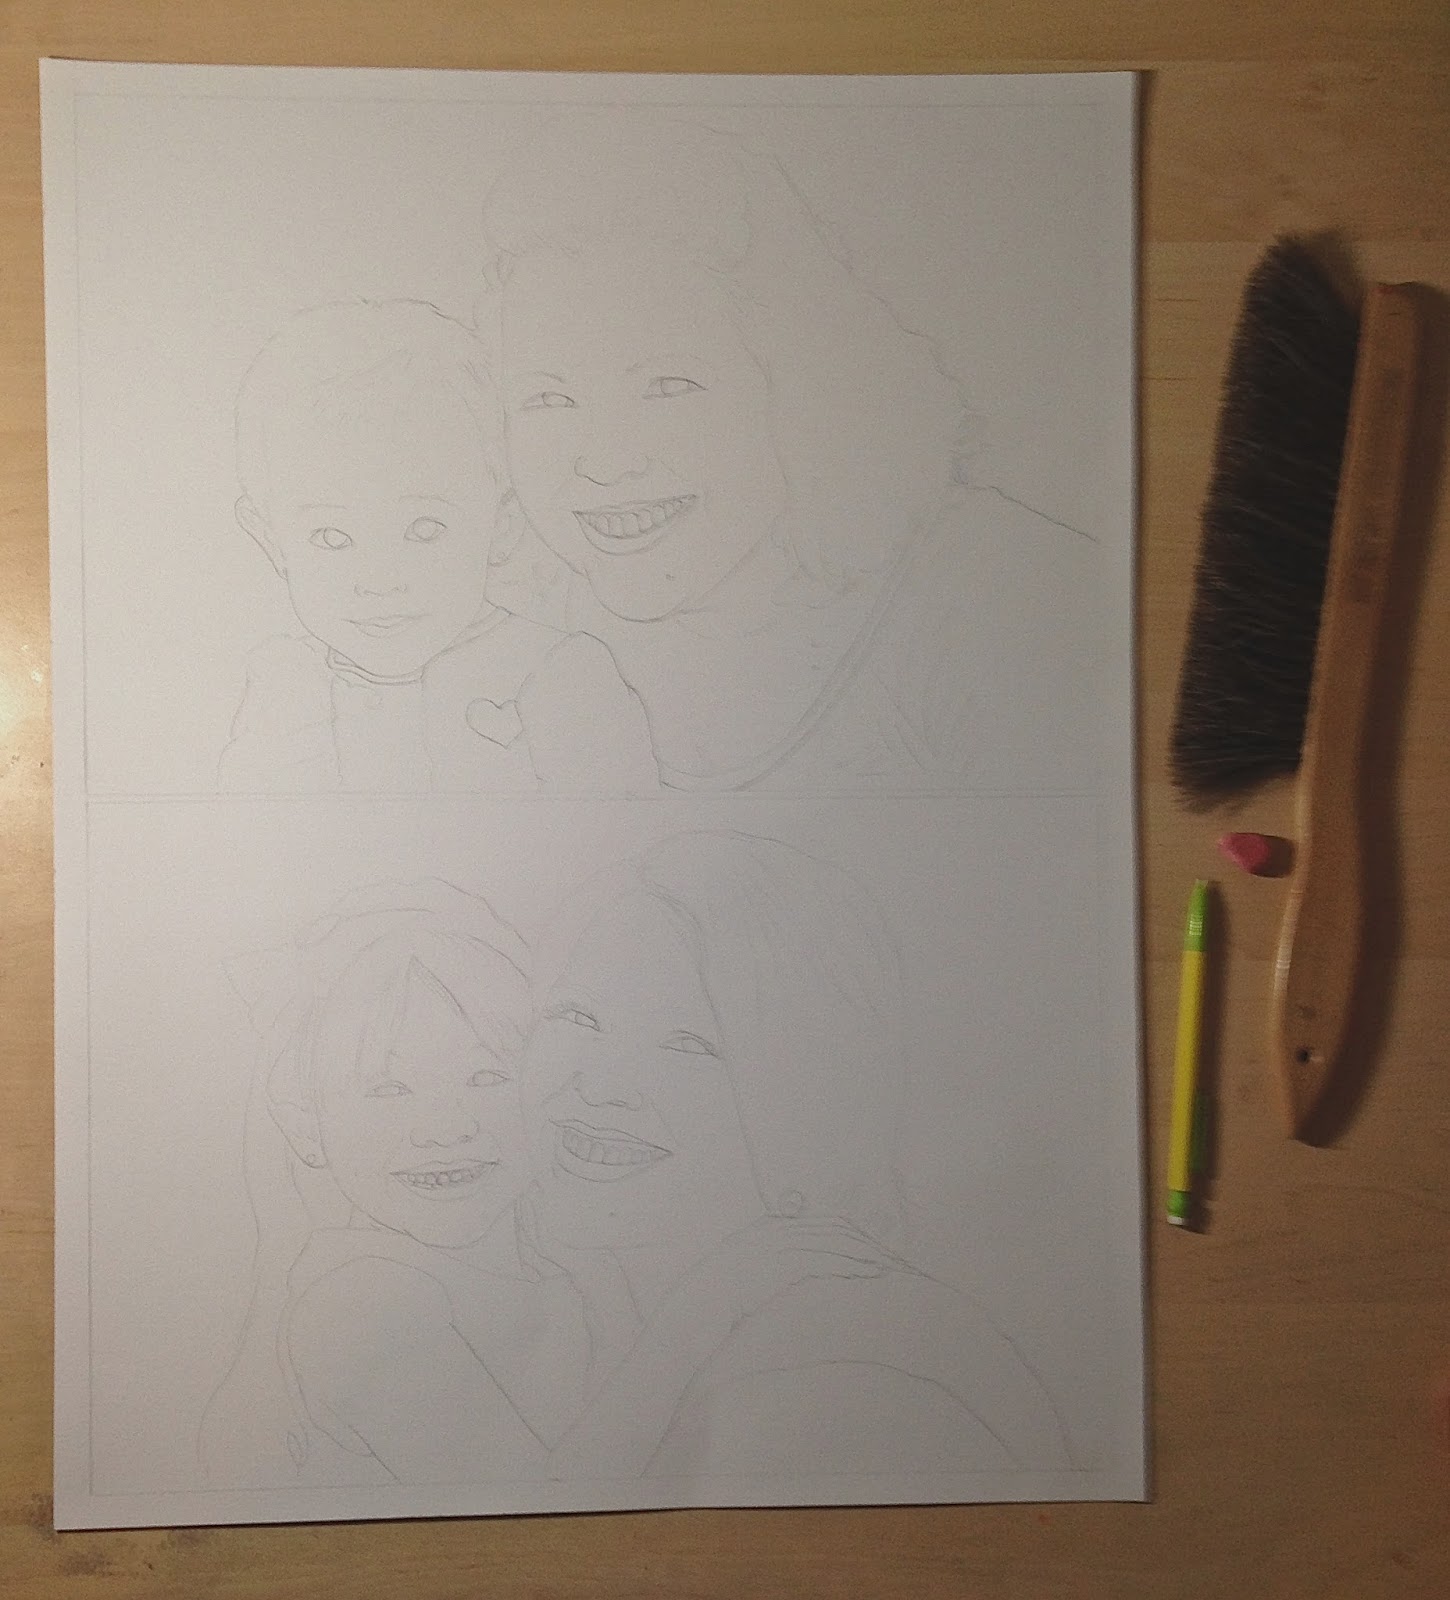
From this point, I will take a pencil and eraser and sit my happy butt on the floor. I have a small home and space is limited, so I use a small corner of my art room. I will trace off as many specific details as I can. This usually takes about 25-30 minutes depending on the size of the image. Once the first image is complete, then I used the same steps for the 2nd image. Once both images have been transferred, then I take a ruler and add at least a 1/2" border around the edge of the entire page. I erase any of the drawing the goes over the 1/2" mark. The final image is not perfect by any means, so I usually go back into the drawing and fix any problems that I see. I try to keep my pencils lines as light as possible, because these will all have to be erased as I go. Stray pencil lines are not going to help to make the piece look like a professional portrait.
 |
| Pencil drawing COMPLETE |
 |
| Measuring 1/2" border |
After I complete this drawing process I always choose my colors for the eyes, mouth, skin tone, and hair. This is so I don't have to stop in between sections and make these choices. When you are in the zone it just makes things more difficult if you have to stop and work through color issues. About 7 years ago I began experimenting with recording my color choices with little swatches of the colored pencils. I choose colors that I believe will work for that specific image and if certain colors don't fit in the scheme when I am done, then I just mark them off of my swatch list. I now have a system where I number each choice, so that I know which color to add next. This has made it so much easier to take a break from a portrait and come back knowing just where I left off. It is embarrassing how many portraits I have given up on due to not knowing the colors that I was using or the place where I left off.
 |
| Example of my Color Journal |
 |
Eyes and Mouth are DONE
8 Skin Tone color choices are shown |
I also wanted to show how I lighten all of the pencil lines as I go. It is a very tedious way to go about this, but it works for me so I have stuck with it. All of my pencil lines are as accurate as I can get them. When it come to the skin tone I erase sections as I go in order to add the color.
 |
Original pencil lines
You can see the Cream outline on the chin and neck
Focus on the ear... |
 |
| Erasing the pencil lines until barely visible |
 |
| Outline ear with Cream Colored Pencil |
 |
One layer of flat color using the Cream Colored Pencil
Facial details are only lightly visible |
As I work through layering my colors for the skin I have to keep in mind where my shadows lie. Once I start adding the slightly darker skin colors I begin adding a bit of the shadow, so I can keep up with where I need to keep building the skin tone. I don't use much pressure when working, but the slightest pressure helps to build up certain sections.
 |
| As far as I could get before needing to add the hair in |
 |
| The cuteness is almost too much to handle<3 |
More to come....


Can't wait to see the end result! Nail biter😁
ReplyDelete